Our latest NX™ software Tips and Tricks video demonstrates some of the essential preferences and settings for getting started with managed mode in NX.
Selecting the right settings is integral to overall design efficiency and productivity. Watch the video below to discover which settings and preferences you should explore before your next session using managed mode.
Customer Defaults – Managed Mode Settings
One of the most important parts of setting up an effective workflow is having the right preferences and settings selected within your system. Under the File tab, inside of Utilities is a section labeled Customer Defaults. This is where we can find the majority of changes that are made at the administrative level when setting up NX.
There are hundreds of options and settings to choose from. These settings and preferences are organized by their application and commands, so to access the managed mode options, we can scroll down on the left-hand side.
 Inside of the Customer Defaults window are a wide range of settings that help to tailor your experience to fit your workflows.
Two of the important tabs under Teamcenter Integration that may often impact your workflows are the “Save” and “Multiple Revisions” tabs.
Both of these tabs are fairly self-explanatory in terms of what they control and dictate.
The Save tab offers a few options to control how often save dialog boxes open, how often parts are saved; and if the material specification table is published upon save.
The Multiple Revisions tab is geared towards checking for revision conflicts. Here, you can enable multiple revisions and specify whether revisions are checked upon loading and saving parts.
Teamcenter Integration Preferences
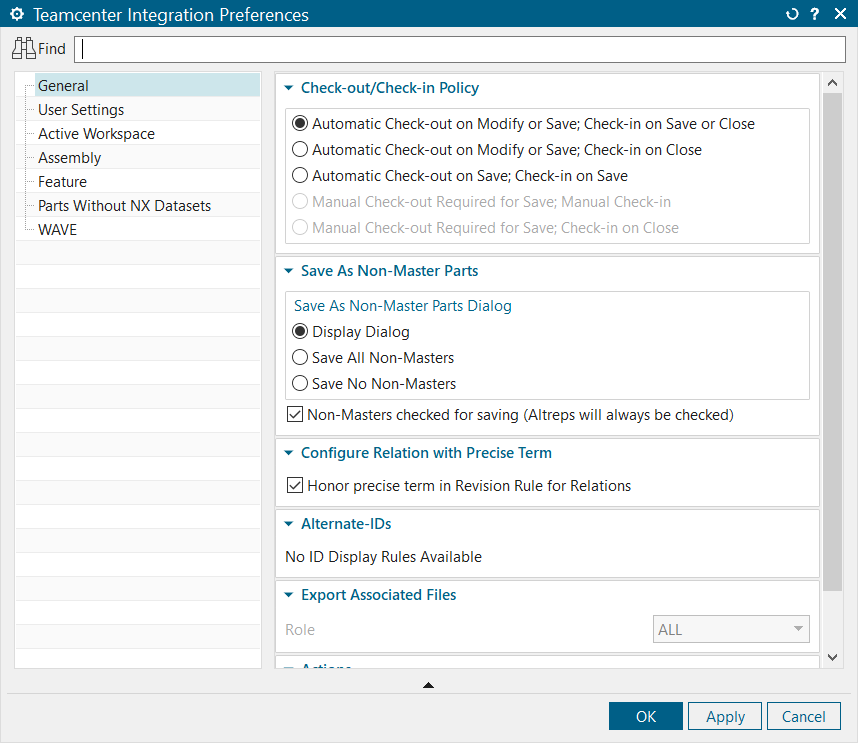
The next place to look when setting up a session is in Teamcenter Integration Preferences. This can be found by selecting file tab, then going down to preferences, and scrolling to find Teamcenter Integration. Once opened, a few of the most commonly used preferences and settings populate in on the screen.
The first section you’ll encounter is the Check-out/Check-in Policy. This section offers an excellent opportunity to configure your system according to your design strategies. At times, it may be more convenient to check out parts upon modification, while at other times, it may simply make more sense to check out upon saving. Checking out parts upon modification makes it easier to avoid overlap with other team members who may need to work on the same part.
Along those same lines, paying attention to the check-in policy is also crucial. When you check in parts upon closing, it prevents team members from opening the same project if you save your parts as you progress.

Teamcenter Integration Preferences shows some of the most important settings for getting started.
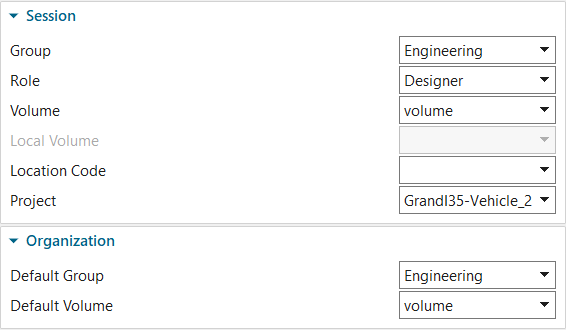
 Additionally, inside this window is a tab for User Settings. This is another important window for getting started in a session.
The first thing to look at here is the Default Group found under the Organization heading. This is where we can select what group we will be in whenever Teamcenter Integration opens. We should only change the group under session after this if we are completing work in a new team or organization.
However, if you do need to make a change for your group or role on a project, the transition is easy. Simply select the dropdown box and choose your new group or role to make the changes. With these settings and preferences selected, it is now time to begin your workflows.
By Jimmy Costello


